
Torus is a board game inspired by go, invented by my physicist friend Erin and myself. This post is a summary of the basics of gameplay we've derived so far.
If you're completely new...
Cross-references
- We host a weekly Twitch stream where we play and review Torus games.
- Here's a download link for Erin's Java client to play the game.
- There's a Torus subreddit.
Rules
In short, with links to animations, the rules of Torus are:
- Captures remove diagonal stones.
- You win by surrounding any single enemy stone with four of yours (up/down/left/right)
- No suicide. (You cannot play where your stone would be captured or you would lose, unless you're capturing the threat or winning.)
- Superko is in effect. (You cannot repeat any previous game state.)
- The "torus" part is that the board wraps around on itself. (This is why we normally show four copies of the 9×9 board side-by-side, to see how it interacts with itself.)
Superko is the only rule that won't come up in the rest of this document. If you're a completionist who, for instance, wants to know the precise order of operations for rules processing, the complete rules are here.
Opening
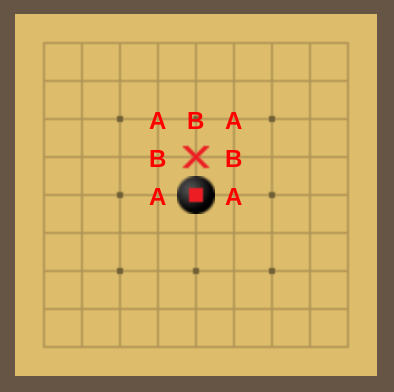
Since the board is toroidal, no matter where black plays, it is equivalent to playing in the center of the 9×9 board. Relative to this opening move, white's options can be reflected until they are in the following octant of the board.
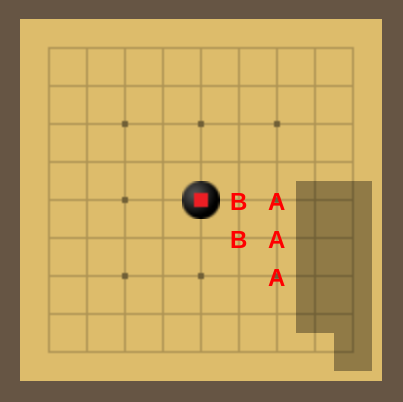
The points marked B are definitely bad moves for white. The top one results in an unavoidable loss (see Approach), while the bottom one simply gets captured, so it gives black a free move.
The points marked A are aggressive. They are more complicated to read out, but our intuition is that they likely inevitably lose in perfect play. However, there are many lines of play to read out, and many pitfalls for black to lose with what look initially like good moves. You can find our analysis of these points in this folder under the names opening-G5, -G6, and -G7. (View the files using the Java client.)
That leaves the shaded points as undecided at this point as to how good they are. (Note that we don't actually know if, in the end, playing first is an advantage (like in most board games) or a disadvantage (see Density), so it could be that one of these shaded points results in white always winning in perfect play.)
Defense I
Any stone played immediately affects the way all the points marked below are read because every stone is vulnerable to an entire loss.
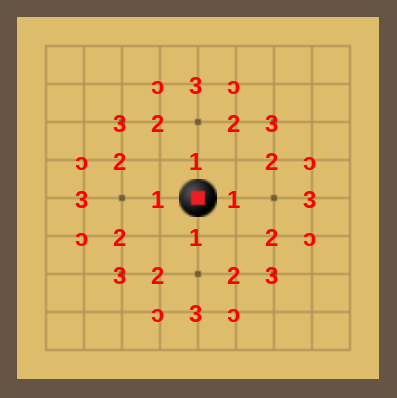
2 are good defensive moves for black.The points are marked as follows:
- Points white wants to play to win on
■. - Points black can play to defend against
1by threatening capture. - Points white can play to defend against
2and prepare for an approach at1.
The points marked open-o ɔ are similar to those marked 3 in that white can play them to defend against 2. However, they are less effective, and typically more than one is required to be useful.
Note that the unmarked points between 1 and 2 are ambiguously useful. They tend to be too close for white to approach safely or for black to extend efficiently. (see Defense II and Density)
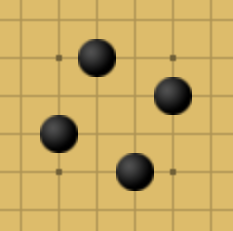
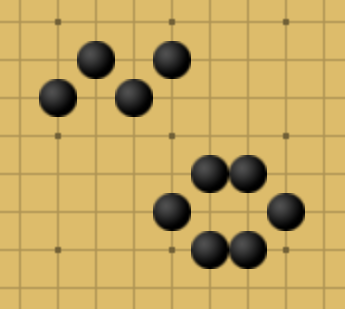
How Defense I gives rise to shape.
When black plays at 2, the two stones defend each other symmetrically, so these knights-move jumps seem to be particularly good moves, giving rise to the following pinwheel structure quite naturally.
Approach
You cannot play adjacent to your opponent without a defense.
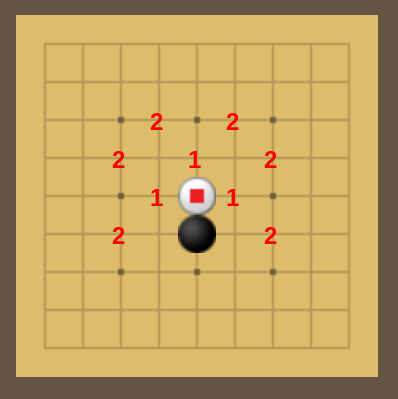
Why? After white plays here ■, both stones are three moves from a loss, and it's black's turn, so black will win if they race. (see Racing) Thus black plays any point marked 1. White now must defend two points in one turn, which isn't possible here. If, before approaching at ■, white already had any point marked 2, it might have been safe. (Whether it is actually safe depends heavily on the state of almost all of the board.)
Defense II
Defense I introduced defense-by-capture, but there is also defense-by-win.
B are also points black can play to prevent ×If black wants to prevent white from playing at the crossed point ×, then they can either play one move at any point marked A to prepare for a diagonal capture of the cross ×, or play one (preferably two) move(s) marked B to prepare for a win on the cross ×.
Two moves are preferred for defense-by-win because:
- it depends on race conditions (see Racing)
- it can be disabled by any white knights-move defense of the cross
×, which white can usually play one of safely
Because two moves are usually required to make defense-by-win effective, we typically avoid it for being too slow. If you find yourself in a situation where it is natural to play, though, go for it.
Also note that the two lower defense-by-capture points marked A were not mentioned in Defense I because they're adjacent to the stone they're protecting. Even though they are good for protecting three points at once (top, bottom, and the point they obstruct), they tend to be too close to be efficient (see Density), so better to save those moves for late-game play.
It is particularly notable that if black is undefended and white makes a defended approach at one of the points marked A, then black's only defense that is fast enough is the other point marked A. (We call this the step-back defense.) It's impressive that there is such a move available, but a bad sign that it's the only one. If white makes such an approach, then they probably wanted black to make that move.
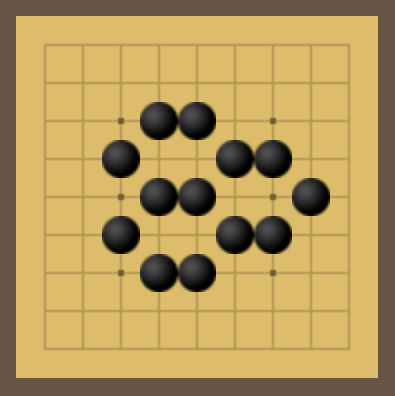
How Defense II gives rise to shape.
The shapes that we've seen that depend on defense-by-win are these wave and hexagon shapes. They are dense, but effective. (Though the wave typically needs an additional pair of stones defending the top and bottom.)
Density
Similar to go, it seems good to gain 'territory,' and playing stones too close together is bad simply because you could have played further apart to gain more 'territory.' However, unlike go, playing too far apart is liable to lose the game rather than the stone, and playing too close together results in a very interesting issue of a limit in 'density.'
Past a certain point, playing any additional stone in an area you control will only make what you have weaker by lining up longer diagonals of stones for your opponent to capture. Consider playing any additional stone inside the following hexagonal lattice. Each one increases liability to capture, and any two are far worse.
As such, it seems that the main long-term benefit to territory in Torus is actually to simply have space to play. If you safely control significantly more of the board than your opponent, then you can play defensively the rest of the game, just waiting until your opponent is forced to either approach you or weaken themselves.
(This rather unusual behavior is mainly why we feel uncertain whether going first is an advantage. Superko is another cause for uncertainty.)
Racing
A race is when both players are able to win in a small number of moves, even with opposition, so they choose to play adjacent to the opponent (dangerous moves) each turn to try to win first. This can be very tricky to read. Consider:
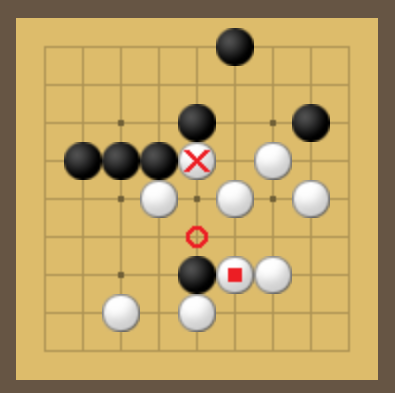
■ is bad, with a loss on ×.In this situation, white has played believing they will win any race since they were 3 moves from winning with 1/4 stones played (black is defending one point, another point is undefendable), compared to how well-defended all of white's stones appear. However, once black responds at the circled ○ point, capturing three stones, white is delayed to still be 3 moves from winning despite having 2/4 stones played, while black is only 2 moves from winning on the crossed × stone with 2/4 stones played (white has no defenses on either point).
Torus progresses through stages of increasing tension based on how many turns it would take either player to win. This is because defensive structures start allowing one, two, or even three stones to be touching an opponent's piece without ending the game immediately. Then players can play increasingly more risky moves, because they're competing against already faster race conditions. (Once there's 2/4 opponent stones around one of mine, it's easier to consider playing on a point with 1/4 opponent stones around it so long as it defends the stone in more danger.)