My brother and I have started playing a point-and-click adventure (The Dig) together over Google Hangouts. Here's how we got the audio to broadcast from a Linux machine, with extra explanation for the general solution.
The Problem
Eric has the game on his Linux computer. He's in a Hangout with Joe. Eric wants to hear what Joe says and the game sounds, while Joe wants to hear what Eric says and the game sounds. So, we want to have the Hangout accept both Eric's microphone and The Dig's audio to send to Joe, while the Hangout's audio and The Dig's audio should go to Eric's headphones. (A diagram is in the first step of The Solution.)
After reading over this StackExchange post and messing with various loopback configurations, we were thoroughly confused about what to do and how to do it. Particularly, we really, really wanted some diagrams. (So this post will have plenty of them, and how to make them.) We also wanted some well-defined terms. (So this post will have a few of them.)
The Terms
Devices
Devices are physical audio hardware like microphones, headphones, and speakers. Virtual sinks are virtual devices. Pulseaudio by default connects each non-device to exactly one device. To connect two non-devices together, a virtual sink must be used. To connect two devices together, a loopback must be used. A loopback has exactly one input and one output, but a device may have as many loopbacks going in and out of it as desired.
Input vs Output
In this post, I'll talk about everything from the perspective of the inner workings, particularly the loopbacks. So an "input" will be a stream-producing entity, and an "output" will be a stream-accepting entity. This coincides with the idea of a microphone being an "input device" and a speaker being an "output device".
The Solution
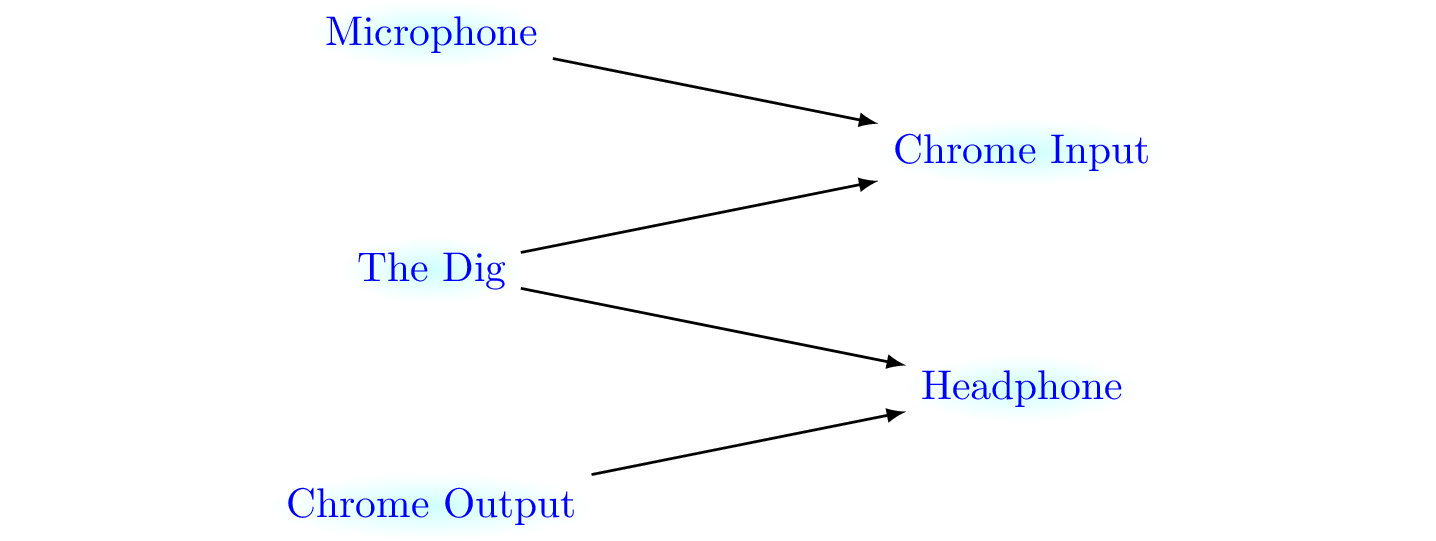
Draw the graph you want.
This means to list vertically all your inputs on the left and your outputs on the right, and then draw arrows between them indicating which should go where. In our problem, that looks like this:
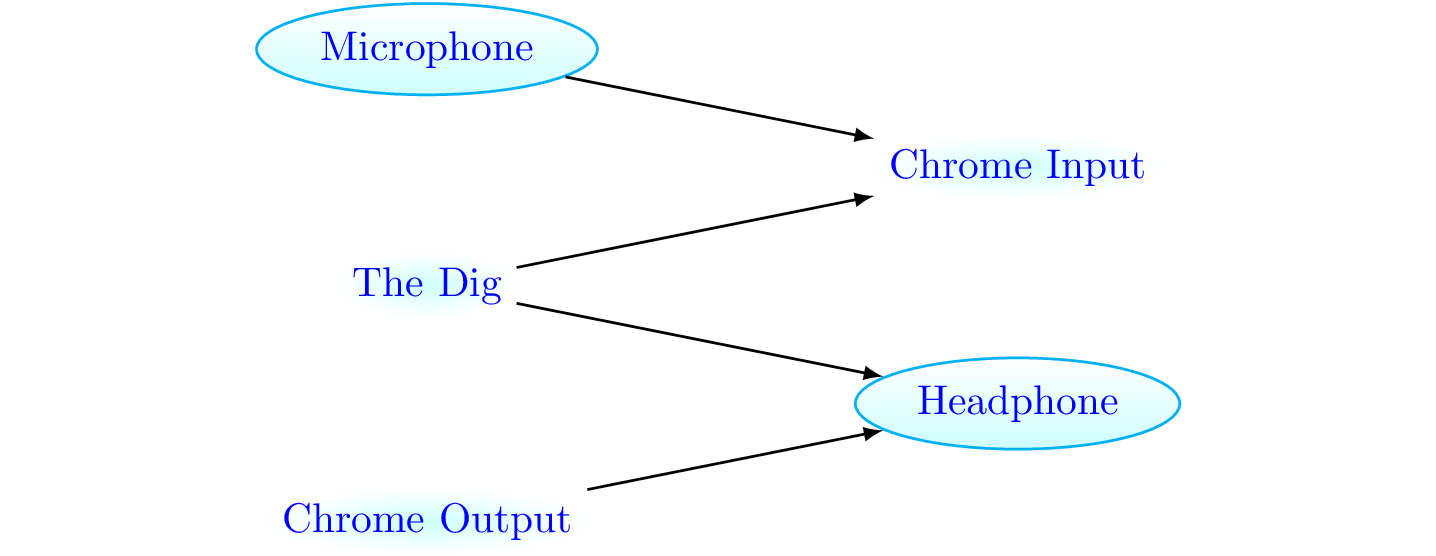
Identify the devices.
Simply circling all your inputs and outputs that are real hardware devices is enough. To check which things are devices, you can find them in pactl list and see if they have any properties named device.<something> In our problem, we had a microphone and headphone that were both devices:
Replace non-devices with virtual sinks.
For each non-device, add a virtual sink to replace it. In our problem, we added three virtual sinks:
Now that everything in the middle is a device, each arrow in the middle represents a valid loopback, and you have a solution ready to implement.
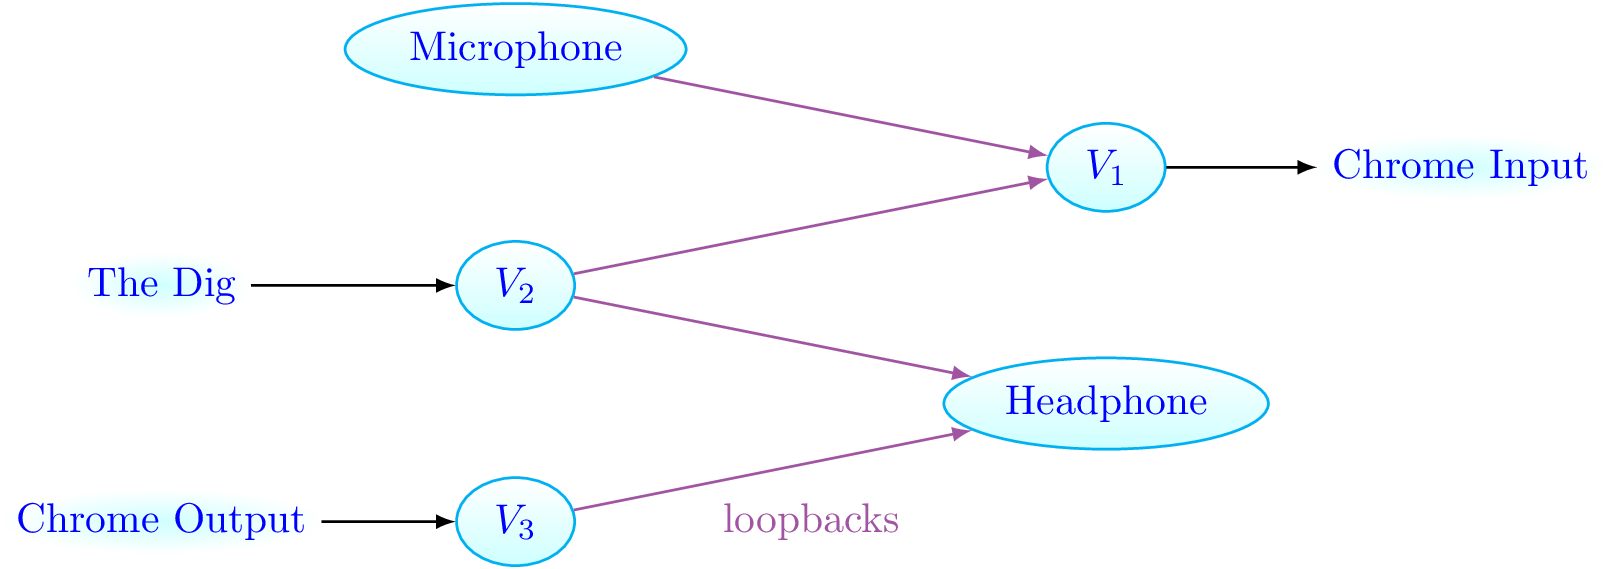
(Optional) Remove unnecessary virtual sinks.
You may be able to simplify your solution by removing some virtual sinks. Particularly, any virtual sink that has exactly one input and one output, with at most one of them a non-device, is unnecessary. In our problem, the fully simplified solution is:

Applying a Solution
In your design, be sure your virtual sinks and loopbacks are carefully numbered, not named, because when you implement your solution, the pavucontrol gui won't display any of their names, but will order them in the way you created them.
Create sinks and loopbacks.
Use pactl load-module to create the virtual sinks and loopbacks. In our example, we used the commands:
pactl load-module module-null-sink sink_name=Virtual1
pactl load-module module-null-sink sink_name=Virtual2
pactl load-module module-loopback sink=Virtual1
pactl load-module module-loopback sink=Virtual1
pactl load-module module-loopback sink=Virtual1
For each loopback, name the sink that should be its input, or at least one that isn't what you will make the output. (Why?)(why-inp-out)
(start why-inp-out)
You can change the input a sink ends up using without issue within pavucontrol, but it won't let you set the output to match what you name as the input here, since it'd theoretically form an immediate feedback loop.
(stop why-inp-out)
Keep track of the commands return. If things get out of hand, you can always restart by running pactl unload-module <number> (for each module you just made.!For loops.)(bash-for) (If you forgot them, use pactl list modules to find them again.)
(start bash-for)
The following line will unload every module from 52 to 56.
for i in {52..56}; do pactl unload-module $i; done
If you need to skip a few, you can hand-pick the numbers like this:
for i in 52 55 56; do pactl unload-module $i; done
(stop bash-for)
Set the arrows.
Run pavucontrol to open a GUI for setting inputs and outputs. Then, for each arrow in your solution diagram, you get to verify with pavucontrol that it is set. This is complicated enough that I made a video to demonstrate it:
The notes from the video give the following steps:
-
(Check the application outputs.)(check-application-outputs)
(start check-application-outputs)
Braid should go to V2... (I'm using Braid as my game here instead of The Dig.) Now I can't hear the game.
Chrome should already go to Headphones, since I hear it... Analog Stereo is Headphones, so good.
(stop check-application-outputs)
-
(Check the loopback outputs.)(check-loopback-outputs)
(start check-loopback-outputs)
While we're here...
They're all set to V1 because of the command when we created them, so only the last one has to change.
Third loopback to Headphones, which is still Analog Stereo. Good. Now I hear the game.
(stop check-loopback-outputs)
-
(Check the loopback inputs.)(check-loopback-inputs)
(start check-loopback-inputs)
All monitoring V2, so only the first has to change.
First loopback from Mic... aka Built-in Analog Stereo. I like to whistle and watch the volume bar to check which one it is. Good.
(stop check-loopback-inputs)
-
(Check the application inputs.)(check-application-inputs)
(start check-application-inputs)
Chrome from V1... All good!
(stop check-application-inputs)
How to make the diagrams.
In case you're interested in how I made the diagram images, I used LaTeX with the tikz package. For the last graphic, for instance, I used (this code.)(graphic-code)
(start graphic-code)
\documentclass [tikz]{standalone}

% based on an example taken from
% http://www.guitex.org/home/images/doc/GuideGuIT/introingtikz.pdf

\usepackage {tikz}
\usetikzlibrary {shapes}
\definecolor {processblue}{cmyk}{0.96,0,0,0}
\definecolor {processpurp}{cmyk}{0.4,0.8,0,0}
\begin {document}
\begin {tikzpicture}[-latex ,auto ,
semithick ,
device/.style ={ ellipse ,top color =white , bottom color = processblue!20 ,
draw,processblue , text=blue , minimum width =1 cm},
nondevice/.style ={inner color = processblue!20, text=blue, minimum width=1 cm},
loopback/.style ={text=processpurp, color=processpurp}]
\node[device] (mic) at (0, 0) {Microphone};
\node[device] (cin) at (5, -1) {$V_1$};
\node[nondevice] (realcin) at (8, -1) {Chrome Input};
\node[nondevice] (realdig) at (-3, -2) {The Dig};
\node[device] (dig) at (0, -2) {$V_2$};
\node[device] (hp) at (5, -3) {Headphone};
\node[nondevice] (realcout) at (-3, -4) {Chrome Output};
\path (cin) edge (realcin);
\path (realdig) edge (dig);
\path (realcout) edge (hp);
\path[loopback] (mic) edge (cin);
\path[loopback] (dig) edge (cin);
\path[loopback] (dig) edge (hp);
\end{tikzpicture}
\end{document}
(stop graphic-code)
Then after running pdflatex on the file, I converted it to a png using ImageMagick with the command convert -density 300 $SOURCE -flatten $DEST where:
-density 300specifies the pixel density of the rendering (since you are rasterizing a vector)$SOURCEis to be replaced with your source file-flattenchanges the background to be white instead of transparency$DESTis to be replaced with your destination file